
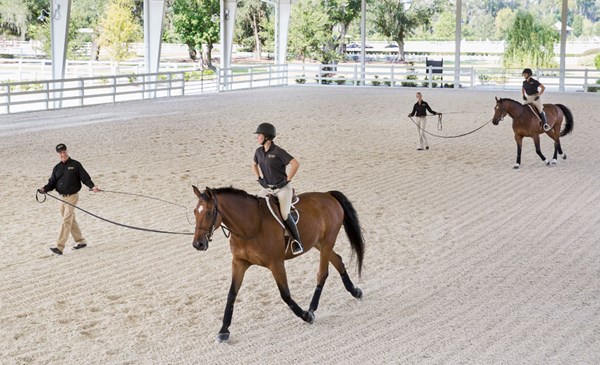
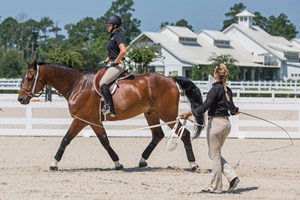
 At the Savannah College of Art and Design, longe lessons are a routine part of the riding curriculum. They give students a chance to focus on fundamentals: balance, position, strength and relaxation—yes, you can have them all! | © SCAD
Longeing exercises are to riders what skills drills are for other athletes. Just like track athletes work to perfect their form instead of running races every day and basketball players practice free throws instead of scrimmaging constantly, riders can isolate important body parts and focus better on technique while riding without reins on the longe line. Longe work can help to create and correct a stable foundation of solid basics. At the Savannah College of Art and Design, we start all of our beginners on the longe—and our intermediate and advanced riders also benefit tremendously from near-weekly longe lessons.
Whatever your level, the longe line can help you strengthen your base, correct a position problem such as rounded shoulders or a stiff lower back, improve your balance, build your confidence and develop a better feel—for example, feeling what diagonal your horse is trotting on. It also can help you learn to move with your horse’s motion, instead of bracing against it. If you compete on a collegiate team, longeing will teach you to find your center of gravity quickly on different sizes and shapes of horses—a critical skill when you have limited time to familiarize yourself with a new horse.
One of the unique qualities of longe lessons is that they can tighten your position and relax your body at the same time. By focusing on riding in the correct position, you both strengthen and supple the muscles that move your joints. Strengthening the muscles between your hip and knee, for example, will help you drop your weight down and around your horse, thus stabilizing your position. Developing the muscles around your hip joint, the most critical joint in a rider’s position, maximizes its ability to absorb shock and keep you balanced in the air over fences.
Meanwhile, the physical exertion of longeing fatigues your muscles, causing your body to relax. Relaxation is a great antidote for stiffness and what I call “Barbie doll equitation”—looking pretty in the saddle but not riding effectively. There seems to be a direct relationship between a stiff arm/elbow and a stiff back. By eliminating your arms from the equation, you can focus on relaxing your back. I tell riders to imagine themselves as soldiers and try to be more “at ease” than “at attention.” By transferring your tension to the strength and security of your position, you allow your spine to relax and absorb the shock of your horse’s motion properly.
Longe lessons also can benefit your horse and ground person. Many horses learn to take a breath and relax on the longe line. The consistency and repetition seems to stabilize them mentally. They also become more tolerant of different things riders do on their backs. Ground people learn to use their voices, timing and instincts to control the rhythm and gait, increase and decrease the size of the circle and deal with horses with different temperaments. Every horse has a slightly different movement and feel and every ground person has a unique longeing technique, so we find that frequently rotating horses, riders and longeing partners benefits everyone.
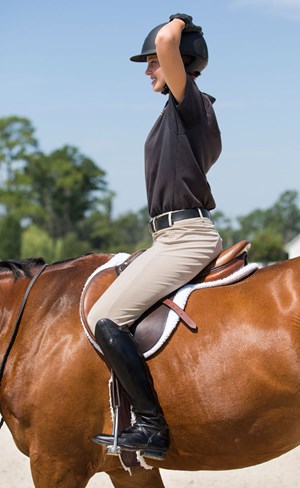
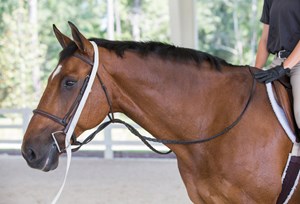 Your longeing person has primary control over the horse—with the longe line fed through the closest bit ring, then over his poll and attached to the ring on the far side—but the reins are there in case you need them. Even with them twisted to keep from drooping near the horse’s legs, you can pick them up and communicate with him at any time should the need arise. | © SCAD
Because longeing is so physically tiring, it’s important to never overdo it. If you work past the point of exhaustion, your position will start to slip and you’ll reinforce bad habits. Don’t longe until you get dizzy and start to fall off! When I see tired students gripping with their knees and toes, I end the lesson, telling them, “You don’t want to develop your toenails!” If you are a beginner, you may last only 10 minutes or so at first. Over time, you can build up to 20 or 30 minutes. For both your and your horse’s sake, break the work up with plenty of walking—and, no matter how advanced you are, limit the session to about 45 minutes total. A little muscle soreness the next day is a normal sign of progression, but if you’re so sore that you can’t walk, you overdid it.
Here are some other important tips and safety guidelines to follow when longeing:
• Always work in a safe, enclosed arena with good footing.
|
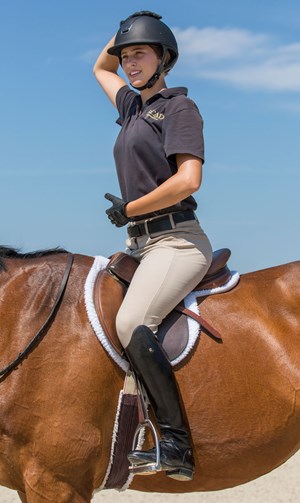
• Recommended equipment: Have your ground person wear gloves and hold a regular longe whip. Run the longe line through the inside ring of the bit and over the horse’s poll, then clip it to the outside ring of the bit. Leave the reins attached to the bridle and twist them together several times before closing the throatlatch around them, to prevent them from slipping down near his legs. Then loop the remaining length of reins over his neck so you can reach them in case of emergency. At SCAD, we do not use side reins when longeing riders because we like the horses to find their balance naturally. We also always put protective boots on the horses’ front and hind legs. Do not wear spurs.
• Start each session with your stirrups set to a normal length so the iron touches just above your ankle when your feet are out of the stirrups. During your ride, adjust them as necessary if you find yourself losing your hip and knee angles and pinching your calves, which indicates you’re your stirrups are too long, or if your knee comes up too high, elevating you out of the tack —your stirrups are too short. If you switch horses, you may notice that you need different stirrup lengths to suit their different body shapes.
• If you want to ride some of your session without stirrups, after your warm-up cross your stirrups in front of the saddle so they won’t clang around at your horse’s sides or, to avoid pinching his withers, remove the leathers and irons completely from the saddle. Be sure to maintain the same angles in your leg that you had with your stirrups. If your knee starts to straighten, you’re getting too fatigued. Toward the end of the session, always replace your stirrups and ride just a little longer. This will create a good stretch down through your lower leg and into your heel, maximizing all the benefits you just reaped from the no-stirrups work.
• Change directions periodically so you and your horse develop both sides of your bodies equally.
• Finally, use common sense. Only work with a horse who is reliable on the longe line and a ground person who has plenty of longeing experience. Don’t make any dramatic movements or changes in your center of gravity that might startle your horse. Also avoid making lots of very small circles, which can be hard on his joints.
The beauty of longeing is that you can create your own personalized program. To zero in on your position weaknesses, run through a quick mental checklist every time you pass the 12 o’clock position of the circle. For example, think, “heels down, knees bent.” Try to push the envelope a little, too—without scaring yourself or your horse. The more you test your balance by moving your arms and upper body around in the saddle, the more secure your lower leg and overall position will become. Here are some fun exercises to get you started:
Starting Out
Begin at the walk with your hands on your hips, positioned so that your fingers are together, locked onto the bony front parts of your pelvis. Relax your elbows and remind yourself not to brace through your arms. Stretch up tall through your upper body while dropping your weight down into your heels. Feel your seat bones rise and fall in rhythm with your horse’s steps. When you are relaxed and comfortable, try the following exercises:
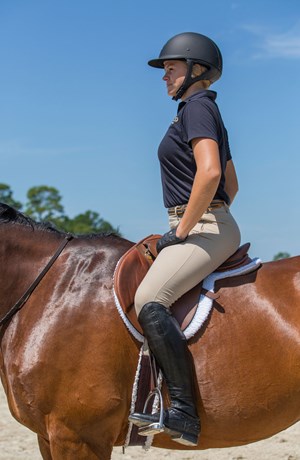
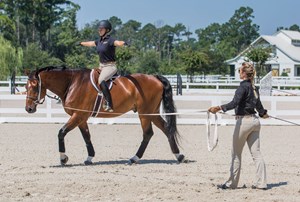 1. Begin your longeing session at the walk, feeling the rhythm of the horse’s steps through your swinging seat bones. Check that your lower legs are directly under your center of gravity and that your hip, knee and ankle angles are all correct as SCAD student Mariel Cooper is demonstrating here. Then, depending on your comfort level, test your balance and position with a variety of exercises. Here, Mariel is concentrating on keeping her fingers steady without changing her leg position. By keeping her eyes focused straight ahead over Cointreau’s ears, she is helping her upper body stay tall and centered. | © SCAD
1. Practice your two-point at the walk. Notice how your upper body tips forward when your lower legs slip backward and tips backward when your legs slip forward. To prevent either case, concentrate on keeping your lower legs directly underneath you, regardless of what your upper body is doing. Stretch down into your heels, feeling the flexibility in your ankles, without losing the angle in your knees.
As your confidence grows, exaggerate your two-point position by bringing your chest closer to your horse’s neck. Then try leaning to either side of his neck. The more you change your center of gravity, the more secure your lower-leg position will become. You’ll also grow much more aware of your balance through feel than you would by listening to an instructor tell you where to move your body.
 2. Many riders unconsciously brace against the horse’s motion with their arms during longeing sessions instead of absorbing it with a supple, relaxed spine and joints. One of the best ways to avoid this is to put your hands on your hips and concentrate on softening your elbows. Feel for the bony prominences on the front of your pelvis, then lock your fingers onto them. | © SCAD
2. Play with different hand positions and movements. Stretch your arms out to your sides like wings of an airplane, concentrating on keeping your fingers quiet. Reach both hands out in front of you. Put both of them on your head. Place them behind your back. Make slow alternating arm circles. Try patting your head with one hand while rubbing your stomach with the other. Change your hand positions frequently to challenge your position and balance. This also will improve the flexibility in your elbows when you take your reins back later.
 3. There are countless fun exercises you can try, first at the walk, then at the trot. For example, place both hands on top of your head as SCAD student Kristin Stine is doing here. Notice how she is staying tall through her upper body and looking ahead while at the same time keeping her weight in her heels. Although she’s demonstrating a secure base, I would like to see her stirrup a hole longer. This would help her get her legs—which are very long from her hip to her knee relative to the length from her knee to ankle—more down and around Gunter’s barrel. | © SCAD
3. Do the twist. With your hands on your hips, rotate your upper body as far as you can to the left, looking back over your left shoulder, then as far as you can to the right, looking back over your right shoulder. This will help to tighten your leg position while relaxing your upper body.
 4. Patting your head with one hand while rubbing your stomach with the other is a great coordination test. Again, notice how Kristin’s position stays centered and aligned over her feet. | © SCAD
4. Post at the walk. This is harder than it sounds. Rise up out of the saddle and sit softly back down in the same manner that you would post at the trot, without disturbing your lower-leg position. For both this and the two-point exercise, you can hold mane, lock your hands at your hips, put them out to the sides or come up with your own creative ideas.
 5. Practice two-point at the walk first, then, as your confidence improves, try it at the trot. Mariel is demonstrating an excellent two-point here. Her weight is nicely down in her heels and her knees are closed firmly against the saddle. To complete the picture, she is looking ahead in the direction that Cointreau is traveling. | © SCAD
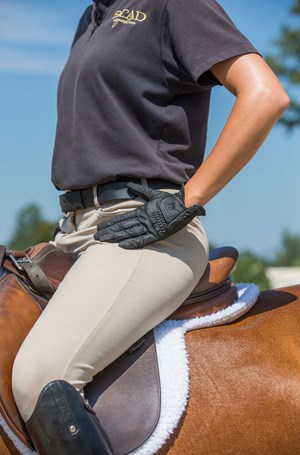
5. To tighten your seat (the base of your position): Grasp the pommel of the saddle with one hand and pull yourself down deeper onto the horse, focusing on closing your leg against the saddle from your hip to your knee. By securing this part of your position, you’ll allow your back to relax. Support your upper legs with steady, well-positioned lower legs. Keep the latter underneath your body, being sure your toes point up but not too far out, which would cause you to grip with the backs of your calves. This can teach your horse to ignore your leg aids or to overreact to them. Instead, you should feel the insides of your calves always connecting lightly to your horse’s sides.
 6. When you feel ready to remove your stirrups, be sure to keep the same angles in your hips, knees and ankles that you had with stirrups. See how Kristin’s angles here are identical to those in Photo 3. | © SCAD
6. Find your horse’s middle gait. In each gait, he should be able to extend and collect his stride and frame. Start by finding his “gears” at the walk. Use your legs to ask him to lengthen his stride while still maintaining the same walk rhythm. Always be sure he responds promptly to your leg aids, asking your ground person for help, if necessary (with her whip and voice if he’s sluggish—and gently correcting with the longe line if he breaks into trot). Then let off the pressure and allow your horse to return to his “middle” walk. Repeat this until you can create two different gears without losing the rhythm.
The above exercises don’t necessarily have to be performed in this order. Do whatever feels suitable to your skills, ability and comfort level. They may challenge you so much that your initial sessions will all be entirely at the walk. That’s fine. When you’re comfortable, try taking away your stirrups for a portion of the session and repeat the exercises, then take them back to finish your session.
When you’re ready to trot, start with your stirrups at a regular rising trot. As you get comfortable, repeat the same exercises you did at the walk. Also work on feeling what diagonal your horse is on without looking down. This is a great way to lose the crutch of constantly looking down to check it. Don’t rush the steps. Give yourself time to develop these skills over many sessions.
For Intermediate/Advanced Riders
As your stability in the saddle improves, spend more of your longe sessions at the trot, experimenting with your own variations of the exercises described above, both with and without stirrups. Practicing two-point position at the trot without stirrups is a particularly tried-and-true exercise for improving strength and balance. Remember to quit before you’re too exhausted to hold the correct position—and always take your stirrups back afterward to confirm the good stretch created down through your lower legs into your deep heels.
Try these exercises, as well:
1. Riding at the posting trot, change your diagonal every four strides. Concentrate on your horse’s rhythm, counting out loud if you need to and noticing any reactions he has to even small, accidental changes in your balance—tipping forward or backward, for example. This will help improve your awareness of what he is doing underneath you—and will help with your rhythm in over-fences work, too. When you’ve gotten the hang of this, change your diagonal every three strides, then every two. Finally, repeat the exercise without stirrups.
2. The sitting trot. When you feel ready to sit the trot, hold the pommel with one hand and pull your weight down into the saddle, focusing again on closing your legs from your hips to your knees. Check that your shoulders stay lined up over your pelvis and heels. Go only once or twice around the circle like this, feeling how tight you can be in the tack, then return to posting or take a walk break.
As your strength builds over a number of sessions, you will be able to sit for longer periods of time. If you get a stitch in your side, take a break! That’s just your abdominal muscles telling you that you’re overdoing it. When you feel confident that your lower legs will stay in position, gradually wean yourself off of holding the pommel. Meanwhile, concentrate on using your upper legs to keep your seat in the saddle, rather than tightening your lower back.
Progress to sitting the trot while rotating through the hand exercises/positions described earlier at the walk. Meanwhile, remember to keep your back, especially your lower back, “at ease”—not slouched, but not stiff either. Carry your upper body tall while allowing your hips and spine to move naturally to absorb the shock and follow the motion of your horse. When this feels comfortable, try sitting the trot without stirrups. This will force your back to be the shock absorber it needs to be, which will, in turn, make it actually relax even more.
Throughout this process, do your best to focus on and preserve your horse’s back, too. He may have to tolerate a little bit of bouncing in the saddle—especially when you’re first learning to sit the trot—but try not to overdo it to the point where you risk making him sore.
3. If your horse is reliable and steady at the canter on the longe and your ground person is very experienced at longeing, incorporate some canter work into your sessions. Just as you did at the walk and trot, hold the pommel with one hand to pull your weight down and around your horse. This will help to keep your seat in contact with the saddle while you learn to follow, rather than brace against, his motion.
 1. To sit the trot well—without bouncing out of the saddle or pounding on your horse’s back—you need a solid connection from your hip to your knee. Mariel is using one hand on the pommel to pull her seat deep into the saddle and close her thighs against it. She is also stretching down through her lower legs into deep heels, all the while staying tall and centered with her upper body. | © SCAD
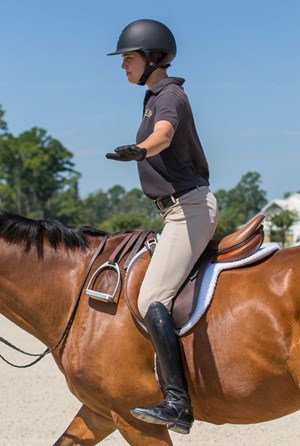 2. One of the best longe-line exercises for strengthening and balancing your position is two-point without stirrups. Practice it plenty first with stirrups, then do your best to maintain the correct angles in your knees and ankles. Kristin’s relaxed shoulders and facial expression here as she rides Gunter belie the difficulty of this exercise. It’s harder than it looks! | © SCAD
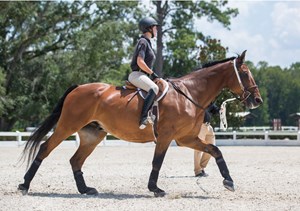 3. If you have a horse with a steady, reliable canter on the longe, this exercise can help you connect your seat to the saddle and move more fluidly with your horse’s motion. Use one hand on the pommel to pull your weight down and around his body while allowing your hips and spine to move freely. Kristin is dropping her weight into her seat and heels while still carrying her upper body tall and relaxed and looking ahead around the circle. | © SCAD
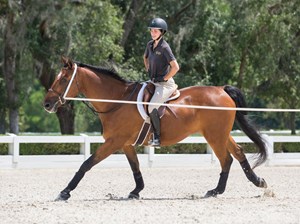
Eddie Federwisch has been a driving force behind intercollegiate equestrian sports for decades. He served as president of the Intercollegiate Horse Show Association from 1994 to 2001 before becoming its director at large and chairman of its hunter-seat committee. For many years, he helped to ensure the success of IHSA’s annual national championships by taking on the role of hunt-seat steward and hunt-seat horse coordinator. This spring, Eddie received IHSA’s Lifetime Achievement Award in recognition of his contributions to the sport. He has directed the equestrian program at the Savannah College of Art and Design, in Savannah, Georgia, since 2013. With his guidance and the tutelage of head coach Ashley Henry, the SCAD Bees won the 2014 American National Riding Commission national division team championship and novice division team reserve championship, and produced both the overall individual national level champion, Ryan Genn, and the overall individual novice level champion, Lindsay Baker.


