with periods of riding in the two-point position (right)..jpg)
Bike riding is a great, unmounted exercise because it improves your stamina and balance while encouraging you to use the left and right side of your body independently. One way to make biking (road or stationary) a rider-specific, interval-training exercise is to periodically change your position from your normal bike-riding position to one that mimics the two-point position. Add in a few intervals of varying pedaling intensity, and you have a perfect interval-training program.
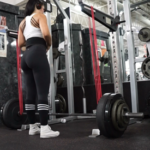
Step One: Warm up your body by riding your bike in the customary, full-seat fashion for a few minutes. Once you feel ready to try the two-point position, find a stretch of road that is free of obstacles, flat and relatively straight. Assume the two-point position by flattening your lower back, opening your shoulders, shifting your hips backward, bending your elbows and placing your weight into your heels. You’ll know when you have the correct amount of weight in your heels when they, and not your seat bones, support your weight. You should now have a slight space between your buttocks and the bicycle seat.
Your hands should softly hold the handlebars in a supple manner and no longer support your body weight. Your shoulders are open and still, and your knees remain bent at all times. Straightening them will cause your hips to shift left and right, a movement that’ll ultimately cause your shoulders to dip from side-to-side. Keep your eyes focused in front of you as if looking between your horse’s ears, and breathe rhythmically. You’ll probably find that riding in the two-point position feels like a 6, 7 or even 8 on the “Rate-of-Perceived-Exertion (RPE) Scale” (see end of article). Ride in this position for one minute. This is your first interval of high intensity.
Step Two: Return to the normal bike-riding position for two minutes. This is your first rest interval. Catch your breath during this time while asking yourself questions like, “Am I placing more weight on one seat bone?” and “Does one hip feel stiffer, is one leg stronger, or is one calf more supple?” You can also use this rest interval to imitate the motion of turning your horse by turning your bike, looking in the direction you are heading toward, opening your inside shoulder slightly, and keeping your hips focused forward. If done correctly, this rest interval should only feel like an RPE of 3, 4 or 5.
Step Three: From this point on, get creative with your intervals of high and low intensity. For instance, your next high intensity interval can consist of pedaling quickly and riding in the two-point position for two minutes (approximate RPE of 7), followed by a three-minute rest period of riding in a normal biking position while pedaling slowly (approximate RPE of 3).
To keep things interesting, you may want to make your next high intensity interval a little less strenuous by riding in the two-point but pedaling a little more slowly, or more so by riding in the two-point and pedaling a little faster. The same principle applies to your intervals of low intensity rest. Just alter the speed of your pedaling while riding in your normal biking position to change the intensity of these rest intervals. As you become fatigued, you may find that you need to lower the intensity or lessen the frequency of your high intensity intervals, and increase the duration and/or frequency of your low intensity rest periods. Remember that a good interval-training session will be performed in such a way that you can continue for at least 20 minutes without stopping and be varied enough to keep you interested and energetic.
A Few Points about the Two-Point
The two-point position is a riding stance you assume when approaching a jump, riding over uncertain ground such as a rocky creek, riding in a controlled gallop across a field, or when you want to give your horse a break by taking your weight off his back.
A jockey’s riding position is an example of this, albeit somewhat exaggerated. To place your body in the two-point position, sit in a normal position on your horse, and then, shift your hips backward and slightly upward toward the cantle of your saddle. If done correctly, your upper body will assume a slight inclination forward, your buttocks will rise very slightly and the majority of your weight will transfer into your inner thighs and heels. You’re now ready for whatever your horse has to throw at you.
Using this scale, levels 6 and below indicate aerobic exercise, and levels 7 and above indicate anaerobic exercise.
Using this scale, levels 6 and below indicate aerobic exercise, and levels 7 and above indicate anaerobic exercise.
Using this scale, levels 6 and below indicate aerobic exercise, and levels 7 and above indicate anaerobic exercise.
Daniel Stewart grew up riding both jumpers and dressage horses. He received a degree in exercise physiology from the University of Calgary and spent several years at the renowned Sports Training Institute in New York City where he was responsible for training and rehabilitating the institute’s equestrian clients.
To order Ride Right with Daniel Stewart, call 800-952-5813 or visit www.EquineNetworkStore.com.